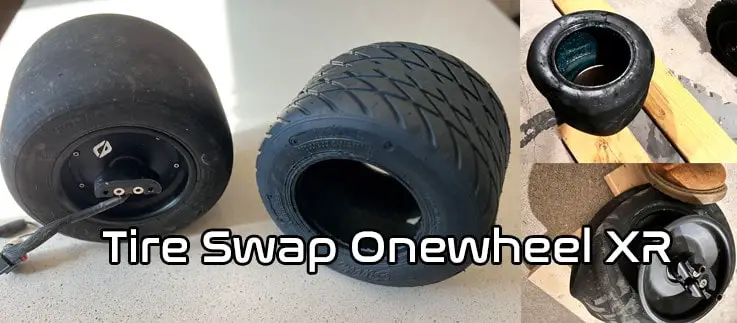
If you have completed over 700 miles or so on the stock tire, likely you are due for a tire replacement. Even if you aren’t quite there yet in mileage but you want the advantages of a new tire, this how-to is for you. While this is for the one wheel xr tire replacement, the Pint X and GT are similar.
Replacing the Onewheel tire can be completed within an hour of time. The tire is secured with 4 bolt hubs and some wiring that will be needed to be detached. Here is the list of tools needed:
- Replacement Tire
- Air Pump (Air compressor)
- Tire Sealant
- Valve Stem Core Remover (usually comes with Tire Sealant)
- 2 Small Planks of Wood
- 1 Larger 2×4 piece of lumber (3 to 4 feet)
- Nylon tire lever
- Allen Keys (1/8″ & 1/4′ hex)
- Small Phillips Screw Driver
- Flathead Screwdriver
- Channel Locks
- Tire Lube (can use Windex)
- Paper Towels & Gloves
Removing the Onewheel Hub Assembly
The first step in replacing the tire is to remove the Hub assembly. It is important you make a basic map of where the screws go for proper reassembly. Detaching the hub from the rails takes a few steps however it is rather simple.
Steps:
- Use the 1/8″ Allen key and remove fender, fender deletes & flight fins.
- Remove the 4 screws on the each underside of the footpads(1/8″ Allen key).
- Remove the bumpers.
- Also remove the controller box screws.
- Remove the 2 screws on the top of each footpad (1/8″ Allen key)
- Lift the front Sensor pad up carefully not putting tension on the sensor wire.
- Remove the top 2 rails screws.
- Remove barrel connector for the sensor by using fingers or channel locks by twisting counter-clockwise. NOTE: twist the side closest to the controller box. (half twist only needed)
- Remove barrel connector for the hall sensor by using fingers or channel locks by twisting counter-clockwise. NOTE: twist the side closest to the controller box. (half twist only needed)
- Push the red or white tab on the motor plug by tapping the tab towards the wheel until it unclicks.
- Squeeze the black portion of the connector and pull the connector out (this is a tight fit so it may require some power or carefully wedging a screwdriver between the box and connector evenly on both sides to inch it out.
- Use Phillip screwdriver to remove cable clips on the undersides of the rails.
- Use Phillips screw to remove the top plate cover on the axle.
- Using 1/4″ allen key, loosen the hub bolts (4 on each side) and then remove them.
- Tire should be detached. Remove rail assembly from the hub assembly.
Removing Tire From the Onewheel Hub
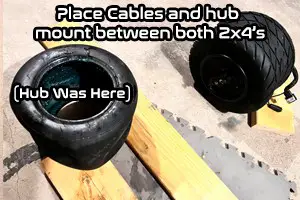
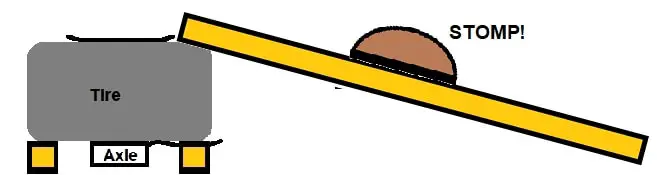
To remove the tire from the hub, you will want to break the bead seal along the hub. Ideally, you would have a go-kart bead breaker on hand. However if this is just a hobby and you only intend on replacing the tire once or twice, you need to have 3 pieces of wood and the detached tire.
- Place both 2×4’s so that there is enough space for the hub mount to rest between the pieces of wood making sure the controller cords are not pinched. (double check to confirm that there is ample clearance [hub is not touching the ground]).
- Lay the larger 2×4 over the tire making sure it rest on the rubber and not the hub (as seen in the image).
- Stomp the piece of wood to break the seal.
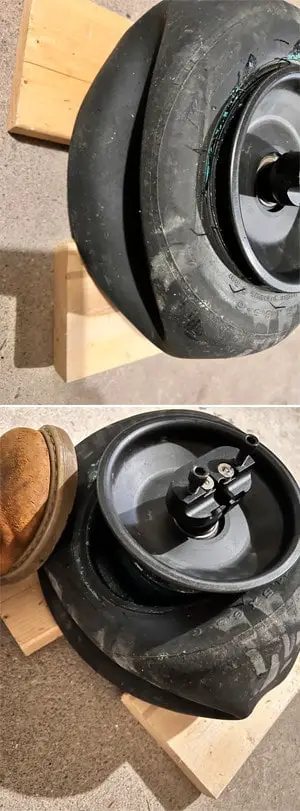
- The tire should be off the rim of the . Using you weight, squish the tire down to the ground and work the hub off by placing the rubber in the grove within the hub. Work it off towards the wire side as that portion of the hub has a good angle to work the tire off of.
- Wedge the Nylon tire lever into the gap and slowly pry the rubber off the hub in a circular motion
- Once enough of the rubber is off, you can wiggle it off completely from the hub.
Installing a New Tire to a Onewheel Hub
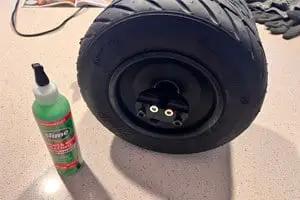
- You will want to clean off the tire sealant from the hub prior to installing the new tire
- Place the new tire (being mindful of the tread pattern if the tire is asymmetrical) on the ground.
- At an angle (wire side facing up), twist and push the hub into the new tire.
- Flip the tire over and use your weight to push the rubber onto the hub (Tip: I utilized a yoga mat so that the hub, axle or bolts didn’t get scratched).
- Spray both sides of the hub with bead lubricant or Windex.
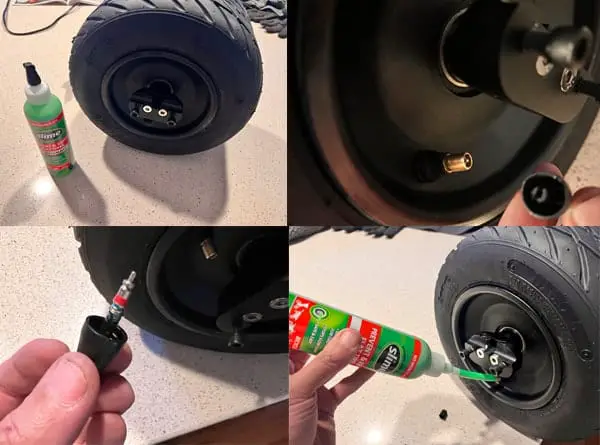
- Set the pump to 45PSI and pump. (If it doesnt set, increase it sequentially to 65PSI).
[If the bead is struggling to set, squishing the tire down with a tire strap sometimes helps force the bead to set] - Once the bead has set, a loud pop sound will occur on both sides. Deflate the tire completely and remove the tire’s valve stem core with the valve stem remover provided by the tire sealant you purchased.
- Add tire sealant or tire slime (recommended 8oz).
- Replace valve stem.
- Re-inflate the tire (roughly to 10% of your body weight).
- Manipulate the tire so that the sealant settles evenly throughout the tire.
Reattaching Onewheel Tire to Rail Assembly
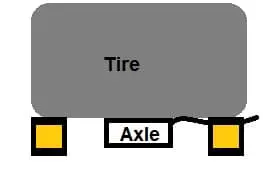
- Position the wheel so that the wires are facing you and the Controller is to your right (battery side is on your left). Align the hub bolts and screw them in loosely by hand.
- Reattach the axle plate cover with the two small Phillips head screws
- Tighten all hub bolts securely with the 1/4″ Allen key.
- Reattach the motor plug (push until it clicks and then push in the white or red tab).
- Reattach the hall sensor. Align the notch so that it is facing the top of the Onewheel. Twist the ring closer to the controller clock-wise until its hand-tight (it should click).
- Reattach the front footpad sensor in the same manner as the hall sensor.
- Replace the controller cover by lining up the screw holes and refastening.
- Align the bumper screw holes on the bottom and refasten hand-tight. Also install the screws on the top of the bumper (Do not overtighten. You run the risk of stripping a screw hole which will damage the rails. The screw holes are fragile).
- Add the top footpads and screw into place.
- Finish by installing the wire clips on the sides of the rails with the Phillips screwdriver. Reinstall any float plate, fender, fender deletes and or flight fins.
The Onewheel tire change should not really take more than an hour of time. If you spent longer than an hour, its likely due to setting the bead or working on removing the old tire. Use the groves in the hub to help remove the tire and if the bead isn’t setting, set a truck strap around the rubber tire. This will force the bead along the hub rim and hopefully help set the bead. You may want to consider also doing a battery replacement if your charge isn’t holding (since you are already into the board’s components).
Now go recycle that old tire at a tire shop or convert it to something artsy like a flowerpot. Once you’re all done, ride your board for about 50 miles to break in the new tire. Enjoy that new tire for 800+ miles. If you happen to incur a slow leak or pop the tire over that time, check our post on how to plug a Onewheel tire.
Recent Posts
The Future of Personal Transportation: Where Does Onewheel Fit In?
Introduction The realm of personal transportation is on the cusp of a major transformation, driven by the advent of groundbreaking technologies and the growing demand for sustainable and efficient...
Two years later we finally have access to Digital Shaping 3.0 which is a tremendous leap forwards in regards to giving you more control of the feel of the ride while providing some great bonuses such...
6 thoughts on “Replacing a Onewheel XR Tire”