One of the most important skills for riding a Onewheel is carving. Carving is the process of shifting your weight back and forth to make smooth turns, and it’s essential for maneuvering around obstacles and maintaining balance on the board. In this article, we’ll go over some tips and techniques to help you master the art of carving on your Onewheel.
Carving on the Onewheel will help with muscle strain and foot fatigue. So if you are prone to either then this how-to is for you. First we will have to talk about the feet. Foot placement is everything.
Carving Step #1 – Foot Placement

The first step to carving is getting your feet in the right position on the board. Start with your front foot angled at a 30 to 45-degree angle so that your toes are almost pointing to the corners. This is more important for the lead foot but if you are a freestyle rider or ride with symmetry, then both feet will be fine.
Perks of a diagonal foot placement:
- Helps with diagonal tension (reduces wobbles)
- Easier to bail on the board (the lead foot is slightly facing the direction you need to run to break out of the fall).
- Better nose and tail control
If you ride with a strictly perpendicular stance, you really are at a disadvantage when it comes to bailing and having control of the board. Please see my post of proper Onewheel foot placement. Diagonal tension is everything and has the most power (more so than strong legs) to quell wobbling.
It also cant be overstated enough that when your lead foot is angled forward, if you hit a divot, pothole or some obstacle that causes you to lose balance, that foot is ready to run. Running out a fall can avoid injury.
Carving Step #2 – Speed
Next, you’ll need to build up a bit of speed. You don’t need crazy speed but you do need enough momentum that can harness some weight. Start at a moderate pace of about 5 to 8 mph, which is enough momentum to lean into the curves effectively. With more practice, you can increase your speed as you become more comfortable with carving.
Also its important to understand that when we reference leaning into the turn, that your weight is always weighted in the inner circle of the carve. So if your carving circle path is heading to the right, you would lean right. If your carving left, lean left. Lean into the semi-circle.
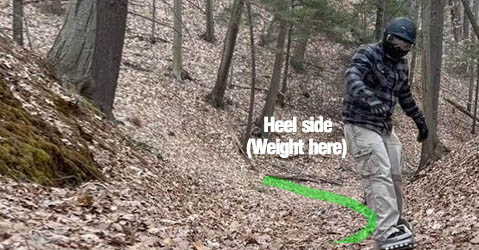
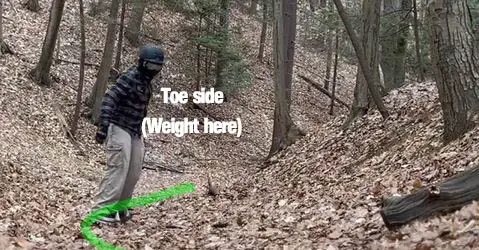
Carving Step #3 – Toe-Side and Heel-Side Action
When carving, you always want to make sure your knees are bent. Then alternate between leaning on your toes and heels to turn in both directions all while keeping your feet flat on the board. It’s important to know how to turn toe side and heel side before carving.
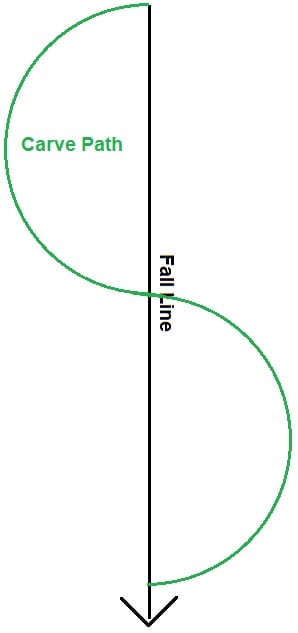
Our path is similar to snowboarding. We head in a “fall line” or the intended straight path that we will be riding. This center path is where we transition from heel and toe side as we make “S” patterns along the trail.
When we cross the center (fall) line, this is the point in which we begin to rotate our body to the opposite side so that we engage the toe or heel side of the Onewheel.
It is ok to have your heels slightly lift from the board however you should always have both feet planted firmly on each foot pad. When you lean, you are simply adding more pressure to one side however the feet do not lift from the board.
Pretend as if you are carrying a large yoga ball. Rotate your torso to complete a semi-circle. When you start to turn, you simply lean into that semi-circle slightly. Once you approach the edge of the trail, start to rotate your torso the other way and lean slightly in the opposite direction.
When you rotate your torso one way (from nose to tail), your toes will have pressure and just the opposite will happen when rotating your torso from tail to nose. You apply most of the toe and heel action on your leading foot. Think of your trailing foot as a stabilizer for now.
Carving Step #4 – Pressure on Foot
It’s essential to distribute your weight evenly between both feet. So in other words, you shouldnt have more of your weight on the left or right foot. Also, your feet should always be firmly planted on the foot pads.
The pressure on the heel or the toe is coming from you leaning. You are not pressing downward intentionally but there is pressure because you are leaning into the turn. Do not add more pressure. The pressure is the natural amount that your body applies to keeping it balanced. There is no need to forcefully push the heels or toes downward.
All the carving is completed in the hip and torso area. The feet should intuitively apply pressure for where you need to keep balance.
Carving Step #5 – Eye Position
When we learn to carve, we naturally look at the board. You should try to avoid this and always keep your eyes forward while carving. When you look down, you can lose balance more easily. Instead, Focus on the path 5, 10 and 20 ft ahead of you. Always keep scanning especially as you build up speed.
Choose the width of your carve. I personally like to carve the complete width of the path I am riding on. Its important to scan the area you are about to ride over. Always have an exit strategy. As a Onewheel rider, you need to have split second decision making. “If I go here then I can exit there” is really what should be crossing your mind as you scan the path. It is extremely important to revisit the path you are riding over every within every 3 to 5 seconds so that you do not ride over a surprising object that takes you down to the ground.
What is The Point of Carving on a Onewheel
All board sports (surfing, skiing, snowboarding and even skateboarding) have a form of carving built into the ride. Not only does it make the ride far more enjoyable but it actually makes for a more stable ride. As mentioned above, carving helps with muscle fatigue but it can help with making for a stable ride as well.
When we carve, we are wielding our weight into the center of our fall line. The fall line is the straight path we are directing to go to. When we make “S” shaped turns, our weight is harnessed towards the fall line and its momentum helps quell out wobbling. Reducing wobbles as well as giving our muscles little breaks along our ride makes for a stronger and more enjoyable ride.
Common Mistakes When Carving
The most common mistake I see when riders try to carve is that they literally push their toes and heels downward so that their Onewheel is at an angle. While carving, our Onewheel is at an angle within a carve however you are not forcefully pushing downward on the heel or toe. It is all about rotating the torso. The feet will naturally hold the balance. Do not apply added pressure.
Also do not try to lean forward. Your weight should be wielded from the hips and generally always centered over the wheel. If you’re riding with your feet totally perpendicular to the riding direction, rotating your body may not feel as natural. Open your feet to an angled stance.
Another tip is if you are carving on a trail that has other riders, maintain a predictable carving pattern. Randomly jutting in a direction can be dangerous for other riders. Unless you announce it or gesture for it, avoid random juts so to avoid an accident.
Conclusion
Riders that have snowboarded before, will pick this up naturally. Its the same process and feeling. When starting out, you should always wear protective gear – a helmet at the very least. You do not need a full face helmet like I have here. I recommend wearing a full face helmet when its cold outside. Otherwise a simply skateboard helmet goes a long way.
When carving, make sure to always keep the knees bent. You should always have them bent whether you are carving or not. Knees bent are your shock absorbers so if you hit some obstacle, those knees should soak it up. If you ride rigid, those obstacles will transfer to your body likely sending you off the board.
Start with small and slow semi-circles (5 to 10 mph). Your leg muscles with thank and your overall ride enjoyment will increase. Keep those eyes up and carve that trail up!
Recent Posts
One of the Onewheel's greatest attributes is that it is all-terrain. If you bought or plan to buy a Onewheel for the purposes of exploring the outdoors, then this is a great reference guide for you....
You've either likely either have seen an advertisement or someone on a Onewheel and seeing how much fun they are. In the same thought, its likely crossed your mind that Onewheels could be hard to...