You mount the board in anticipation that the front sensor will engage as inspected however it fails to do so. Your lead foot hits the ground and your frustration is sky-high. The front sensor has been developed by Future Motion to be not too sensitive so to avoid ghosting yet sensitive enough so that it engages when you want it to. But what if it doesn’t engage when you need it to? Here are six fixes to cure your sensor woes.
Sensor engagement issues are not necessarily model specific. Some have had or are more prone to issues however either Future Motion has provided a recall or there are several fixes for Onewheel sensor engagement.
Hack #1 – Fix Your Shoes – Flat Soles For Solid Contact
If you are experiencing sensor engagement issues the first thing you really need to inspect are your sneakers or shoes. Because I do a great deal of trail riding, I used to always wear trail running sneakers. These types of sneakers have aggressive tread and also have a curved sole which does not help with sensor engagement at all (but they did allow for some good hiking off the board).

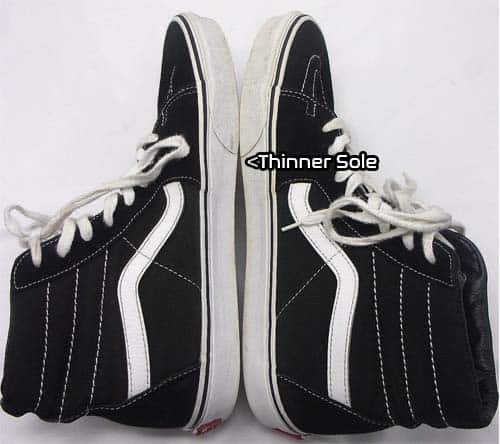
I have since gone with Van Hi-Sk8’s with Dr. Scholls’s gel inserts to act as added shock absorbers. These definitely have a thinner sole however the soles are completely flat!
You can cover the sensor completely without any gaps. Before these I was wearing Vans ComfyCush however after a minor ankle scrape, I realized the importance of high tops. Cover ‘dem ankles because even the tiniest scrape on the ankle is annoying as hell!
Hack #2 – Furniture Pads On Onewheel Grip Tape
Furniture felt (polyester) pads are is the cheap and dirty way to getting the sensors to always engage especially if you are wearing a sneaker with aggressive treads. I prefer the long furniture strips or using a just a square of it where I can cut it to size so that it has a better coverage however even the smaller squares or circles will do the trick.
To ensure that this hack works well, you need two strips or pads covering the left and right side of the sensor. You’re foot placement should be angled for diagonal tension so make sure your pads are relative to your foot angle.
Use the sneaker that you typically ride with and find the contact spots. Manipulate the strips so that the felt pads have solid contact.
Test the engagement a few times. Once you have perfect engagement, you’re all set!

You want to use felt pads because you actually do not want these pads to be grippy on the top or they will rip off.
While this hack works great, some do not like the look of the pads on the sensor. Admittedly, it didn’t bother me at first but then it started to bother me more and more. Since this I have swapped to another solution.
An option similar to this that cost a little change is “Gripples” by theFloatLife. These are essentially stomp pads for the Onewheel that will help with sensor engagement as well as improve the grip to the Onewheel.
Hack #3 – Added Grip Tape Strips
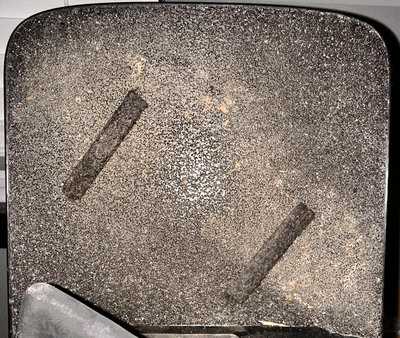
Ok so this is a semi-hack. Initially I did this because when I would wear trail sneakers, my foot pad grip tape would wear out constantly. I would add a strip of grip tape where my “sweet spot” was where I knew I always had good engagement.

In this image you can see a worn footpad however there is a strip of grip tape where I always line the ridge of my foot on.
In this image, you can see where I had worn out the grip from riding. The added tape was initially to regrip the pad but it also helped line my feet up. I place them on both pads just for the reference.
What I like about this hack is that adding the strip is a good visual to see where your feet should be. On trails, your feet get jostled around and the strip is a good point of reference that will align the foot and maintain that perfect point of contact. It is also great to re-grit older pads.
Hack #4 – Posi the Onewheel Sensor
The way the sensor works is by having the two zones (left and right) work together. Once both are activated (weight sensed on both), the motor will engage. When we Posi the sensor on the Onewheel, we are bridging the left and right sensor to make one zone. This essentially eliminates a lot of the engagement issues as it only needs to sense weight for the motor to engage.
The main drawback for many riders on the Posi-sensor hack is that because you are bridging both zones, you no longer have the ability to do a toe or heel lift for stopping on your Onewheel. You have to complete a Quick Stop or jump off the board.
You can roll your foot to the edge (bezel of the foot pad) to also disengage the motor. This just isn’t as nice of a feeling as a traditional heel-lift stop. If you are big into heel-lifts for stopping, I would skip this hack otherwise go for it!
In the Posi sensor post, there are instructions to complete this for Pint, Pint X (PX), XR and GT. It is a simple and reversible hack that you can try that will not damage your board (so long as you remove and reinstall the parts properly). You can also purchase a Platypus / Platysense Foot pad and sensor which essentially is a posi sensor built into the wider foot pad. This will just cost you a couple hundred for both pads but it’s a total upgrade and different feel.
Hack #5 – Removing the Sensor Onion

Removing the sensor onion is essentially removing the top plastic coating on the sensor. I have not tried this personally as I do not want my sensor to be that sensitive.
My concern is when water lands on the grip tape from wet trails. Instead of it drying up over time, it may dampen the sensor which could impact how the sensor reacts. If you are interested in attempting this hack however watch Jeff Adair complete this hack on how to do it properly.
Note: If you damage the sensor in this process, you will need to purchase another. This hack is not recommended for someone who does not already have a spare sensor on hand.

Hack #6 – Purchase SureStart or SureStart Pro
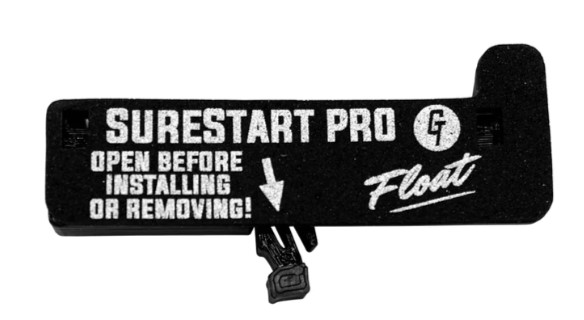
There are some differences between Surestart and Surestart Pro and they make all the differences in the world. Essentially this device makes a posi sensor out of your stock front foot pad. With the pro model however there are features that allow the motor to remain engaged when your weightless (air sense), allow for deactivation delay all while keeping the ability to do a heel-lift stop.
If you want to keep heel lift stopping an option, this sensor essentially knows when you are slow enough to revert back to two zones which gives you the ability to heel lift stop. It does come at a price of $99.00 at the Float Life. It is available for GT and and Pint. While this is the last ranking Hack, it is the most refined solution. It is only listed last due to it being a cost to solve sensor issues. If you love heel lifts, want to have the motor engaged while in the air or need a delay on the disengagement – go with a Surestart!
Conclusion
I do also want to mention that if your Onewheel is still under warranty, you can always contact support on their website to see if they can repair or fix any sensor issues. I had actually reached out to Future Motion for this specific issue.
Future Motion will need your board’s information and (in my case) they asked for me to send them a video of me engaging and disengaging the sensor.
After Future Motion reviewed the info, they concluded that the sensor is fine. Well it wasn’t fine for me. They did send me a new sensor however I had to pay for it. Hopefully your situation will be covered. If not, try one of these tricks for sensor engagement improvement and save a little money.
F.A.Q.’s
Not necessarily however it does improve with diagonal tension which will help mitigate the wobbles.
If you have a Pint or GT, when you press down on the sensor you will see the lightbar light up on its respective side. On an XR, you can view this data within the app. If you are pressing down firmly on the left or right side of the sensor and about an inch away from the edge of the pad and it does not engage, perhaps there could be an issue if it doesn’t engage. If the board is still under warranty, submit a support ticket to Future Motion.
If you are going above 1 mph then you do not need both to be engaged, just one. You may experience receiving a notice or warning that one side of the sensor isn’t detecting weight. This isn’t really a concern however you should investigate what it could be causing it. Often its shoes or riding over a certain part where you may have lifted your heel.
Again it is ok to ride on a single zone so long as you are maintaining a speed over 1 mph.
You can hide an airtag within the compartment near the controllers however it is better to modify the bumpers to hide the air tag.
Recent Posts
One of the Onewheel's greatest attributes is that it is all-terrain. If you bought or plan to buy a Onewheel for the purposes of exploring the outdoors, then this is a great reference guide for you....
Hopping on a Onewheel and no not have the sensor engage can be a total drag. Onewheel riders constantly find ways to work on improving sensor-engagement. From flat sole sneakers or shoes, adding...